


Second Grade Art Lesson 25
Texture Rubbings, Part 2 Designing Row Houses on Our Textured Paper
Objective:
The student will complete a collage using the textured paper we made last lesson of Row houses. The student will arrange the cut shapes so that there will be four houses with three stories. The students will complete the work by adding details with black crayon.
Materials:
texture papers from last lesson, scissors, glue sticks, black crayons
Procedure:
Begin the class by asking if anyone knows what a row house is. Explain that row houses are houses grouped together in a row. Sometimes you may hear someone call them town homes, but basically they are dwellings that are built one right next to the other with no space between them. Typically they are two to three stories high. Today we are going to build our own row houses using the textured paper we made last week. Begin by cutting rectangles. If you put all of your textured sheets together you can get consistent sizes and save time. We want to put our row houses so that we have four across that are each three stories high. That will mean each row house will need three rectangles plus a roof. Go to the Arttango web site to look for examples of roof styles. Once you have enough pieces cut out, take the one sheet that you painted a sky on and use your pieces like you would a puzzle, playing around with them until they look like they are in the right place. Try using several different textures on each of the four row houses. Students may want to trade texture pieces with one another to get a bigger variety to work with. Once you feel you have the best looking arrangement, glue the pieces down. Finally, use a black crayon to draw in details on each of the four row houses. Again you may want to refer to the web site to find examples of window and door shapes and decorative treatment for the buildings.
Conclusion:
Hang the finished work on a wall in a horizontal arrangement so that it appears you have an entire neighborhood in your classroom. Have the students look at each piece and point out the strengths they find. Ask the students to specifically notice the textures and try imagining the work without the textures. Would the buildings be as interesting to look at? Encourage the students to use the left over scrap papers to make another texture collage of anything they may want to make.
Artwork and Examples used in this lesson
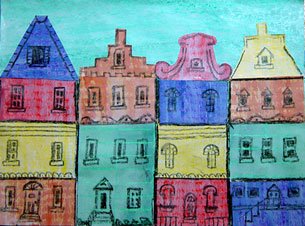
Teachers Example
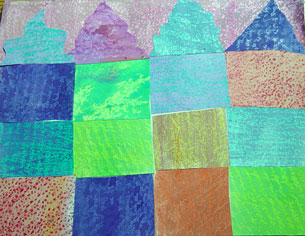
Student Artwork
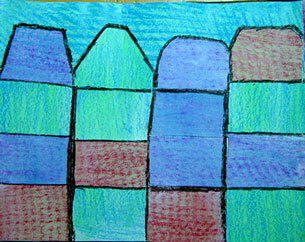
Student Artwork


Arttango © All Rights Reserved 2013. All logos and images used on this site are the property of the rightful owner