


Third Grade Art Lesson 3
Overlapping Shapes, Working with Texture and Pattern
Objective:
The students will review the art elements shape, space, and texture. The student will create a collage using each of these art elements.
Materials:
Scissors, heavy paper or tag board to make a template, white drawing paper, markers
Procedure:
Let's begin by looking at shape. A shape is a two-dimensional area. Shapes are flat, having only height and width. Have the students name several common shapes. Have the students select one shape and cut it out of the heavy paper or board. The shape should be approximately 3 x 3 inches. Next let's look at space. One way to create space in a work of art is by overlapping, that is having one shape in front of others. Using your cut out shape, trace around the edges in the center of your white paper. We will continue tracing this shape, only we want all the other shapes we trace off to look as though they're behind the central shape. To do this, lay your shape somewhere near the central shape. When tracing the second shape, trace along all lines until you come to the outline of the central shape. Continue this process until you've filled the paper with overlapping shapes. Next using your markers, fill each shape with a different texture. Texture is the quality of a surface. Name different surface qualities furry, rough, smooth, etc. Creating visual texture makes your drawing more interesting. It is not difficult to do, but requires patience. To create a texture, simply come up with some mark (an x for example) and repeat it, letting the mark overlap itself until you fill the area. Look around your room to get ideas and examples for different textures. Once each of your shapes has a texture on it, color in your backgrounds solid.
Conclusion:
Before you call your work finished, make sure you have filled your space with your shapes, and have filled each shape with your textures. Mount your work and display for everyone to enjoy.
Artwork and Examples used in this lesson
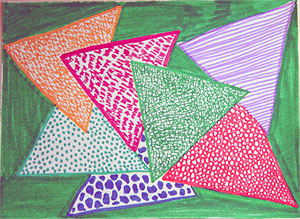
Teachers Example